Tag Archives | crafts

A Little Knitted Snowman Pattern for Christmas

Today started off at 6:30am, Kye was ready to get up and so our day began. I gave him breakfast, (everyone else slept until much later) fed the chickens who were waiting at the front door and loaded the dishwasher. I wanted to knit a small project today and so I decided on a teeny snowman as a hanging ornament for the Christmas tree. He is about 2.5 inches altogether and then there is the little loop to hang him with which isn’t included in that measurement.

I still can’t get over the fact that Christmas is going to be here so soon! It’s like this whole year has just sped by at warp speed and then it will be 2013!

Every morning I check the newspaper to see what’s been happening over in the US, the photos are grim, so much water and flooding, my heart really goes out to everyone who is there experiencing this catastrophe.

I have a little pattern to share today, a small knitted snowman, he is perfect for hanging on your tree, or as a gift tag or place tag for the table etc…

Abbreviations: kfb: knit into the front and back of a stitch to increase.

Materials:

3.5 mm circular needles

dk beige yarn

dk red yarn for the scart

dk black yar for the hat

black fleece for the eyes

orange fleece for the carrot nose

felting needle

sewing needle

fleece for stuffing

Pattern for the Snowman:

With 3.5mm circular needles cast on 6 stitches and join for knitting in the round.

Round 1: Knit

Round 2: Kfb into each stitch (12 stitches)

Round 3: Knit

Round 4: Kfb into each stitch (24 stitches)

Rounds 5-9: Knit

Round 10: (Knit 2 stitches together) across the round. (12 stitches)

Round 11: Knit

Round 12: (Knit1, knit 2 together) across the round. (8 stitches)

Round 13: Kfb into each stitch across the round (16 stitches)

Start putting your stuffing into the snowman, make sure he is firmly stuffed.

Rounds 14-15: Knit

Round 16: (Knit 2 together) across the round (8 stitches)

Round 17: Knit

Stuff the head firmly, break the yarn and thread it onto your sewing needle. Thread the needle through the stitches, stuff the head more until it is full of stuffing and then pull the yarn tightly and finish off.

Snowman’s Hat:

Cast on 10 stitches with black dk yarn and 3.5 mm circular needles.

Rounds 1-4: Knit

Round 5: (Knit 2 together) across the round (5 stitches)

Round 6: Knit

Round 7: Knit 2 together, knit 1, knit 2 together (3 stitches)

Cut yarn, thread yarn onto the needle, thread the needle through the remaining stitches and pull tight, finish off.


Sew the hat onto the top of the snowman’s head and add a loop at the top of his hat.

Needle felt on two little black eyes and an orange carrot nose.

Scarf:

The scarf is knitted as an i-cord. Cast on 2 stitches with double pointed needles and knit until your scarf is about  4 inches long, mabey shorter.

Bind off, sew in the ends.

Sew the scarf onto the snowman.

Sew in all ends:)

Happy knitting! 🙂

38

Tie Dyeing T-Shirts with my Children

We have been having great fun tie dyeing T-shirts and experimenting with dyes.  First we dyed with a solid colour using a pot with the boil and simmer method, then we decided to try a hand-painting method which I prefer.

This is what we did:

– We soaked our white t-shirts in a bucket of vinegar water, (a couple of litres of water and I added a cup of vinegar). I let that soak for about half an hour. The vinegar makes the dye take to the fabric like it does with yarn.


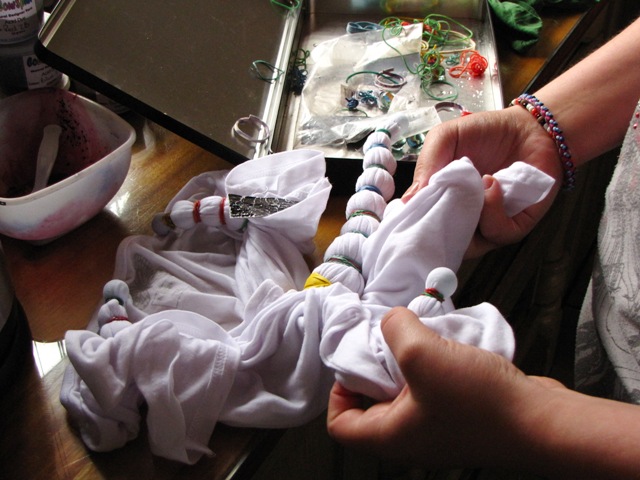
The shirts were placed flat on a counter top surface and marbles were held at the back of the shirts and pushed upwards, an elastic band was then placed around each marble. The elastics were very tight to keep out the colour and keep the whiteness of the fabric.

The dyes were mixed into rainbow colours, these are earth friendly dyes.

Then each colour was hand-painted or squeezed out onto each little bauble so that we would have circles of colour afterwards. This was so exciting, really, like digging up a potato plant and discovering plenty of delicious potatoes under the ground, like precious gifts!

Kye had SO much fun doing this!

Oh yes, don’t forget to put plenty of plastic down on your counter tops so that the dye doesn’t go anywhere it shouldn’t. I used bin bags and then just washed them afterwards.

Once all the colours had been added, I really wanted to put the shirts into our solar cooker outside in the sun but we had rain that day so each shirt was wrapped in plastic wrap, placed in a sieve over a pot of boiling water with the lid on to boil for 20 minutes, this seals the colour. I have separate pots, sieves and everything for my dyeing work.

Then I removed the pots from the stove, allowed the plastic wrap to cool and when the shirt was cooler, rinsed it in cool water to let any excess dye run out.

This was one of the most enjoyable crafting activities we have ever done:)

This is Jenna’s T-shirt.

Erin’s

Kye’s.

Happy Monday and have a lovely week.

PS for everyone who very kindly offered to test knit my Camel pattern, a thread has been started over on my Mamma4earth Ravelry group where you can also read the test knit requirements and take part in the discussions.

12

Natural Suburbia Christmas Ornament Swap 2012

Right, the girls have been taken to rehearsals for their town play and I have finished preparing  a roast chicken for lunch, it’s in the oven, such an amazing recipe and smells amazing! I just Googled Jamie Oliver Roast Chicken and there it was! Anyway now I can sit down and tell you all about the Christmas Ornamnet Swap:)

I love the season of Christmas and can you believe that it’s just around the corner? I am sure many of you have already started your handmade Christmas gifts for family and friends. I want to try and make each family member at least one handmade gift, but we will see…

Last years swap was so much fun so I am very keen have another one now in 2012.

If you would like to sign up for the swap here are a few guidelines:

-this is an international swap open to everyone.

-the theme for the swap is Christmas ornaments, you can use any craft technique as long as it has a Christmas ornament theme.

-If you would like to add a few extra items to your parcel this is totally up to you.

-please feel free to email your swap partner and get to know them if you wish.


How to Join:

If you would like to take part in this swap, this is what you need to do:

Leave a comment in this post and please email your:

  • Name
  • Address
  • Email address (please include your email, otherwise I have to go and search for it:)
  • Blog link if you have one

to my email address, lindadawkins@mweb.co.za and I will pair you with a swap partner.

This is an international swap so wherever you are, you can join:)

Please feel free to add this photo to your sidebar of your blog with this page link.

Very Important:

Please, if you decide that you no longer want to take part, just send me an email so that I can pair your partner with someone else.

Swap Angels:

If you would like to offer to be a swap angel (someone who will send out one extra swap item to anyone who has not received their swap for whatever reason) just add that to your email you send to me.

I have created a Natural Suburbia Flickr group for the swap, here you can upload photos of your swap items. To join the group, please send a request here.

The closing date for signing up for this swap will be the 15th of October.

Your swap parcels will need to be sent out by the 28th of October if you partner is overseas, if your partner is local then your swap can be sent out by the 15th of November.

I am so looking forward to this lovely swap.

Linda

36

Creative Friday


Christmas Wreath Pattern

Welcome to Creative Friday

Thank you so much to everyone who shares the love and their beautiful links:) Please feel free to post your links to anything you have created and would like to share, it can be a recipe, sewing tutorial, knitting tutorial, felting, crochet, crafts, art, spinning, weaving, working with fibre, photography, poetry…etc…


I also love to hear from you, so if you have a moment, please leave a comment:) Thank you so much for sharing your wonderful talent with us! Just add the name of your blog to the widget and then add your blog link with the http:// at the beginning of your link address:) I have added a Creative Friday button on the sidebar of my blog, please feel free to add it to your blog for Creative Friday and link it to http://www.naturalsuburbia.com/ so others can find this space and share their creativity too:)

1. I have started a Creative Friday Flickr Group where you can post your beautiful photos that you link to each Creative Friday. To join the group, please go here.

2. If you would be so kind as to link back to Natural Suburbia in your blog post that would be lovely:)

Have a wonderful day,
xo
Linda


Related Posts Plugin for WordPress, Blogger...
11

Powered by WordPress. Designed by Woo Themes


Hit Counter provided by Los Angeles SEO Company