Archive | Halloween

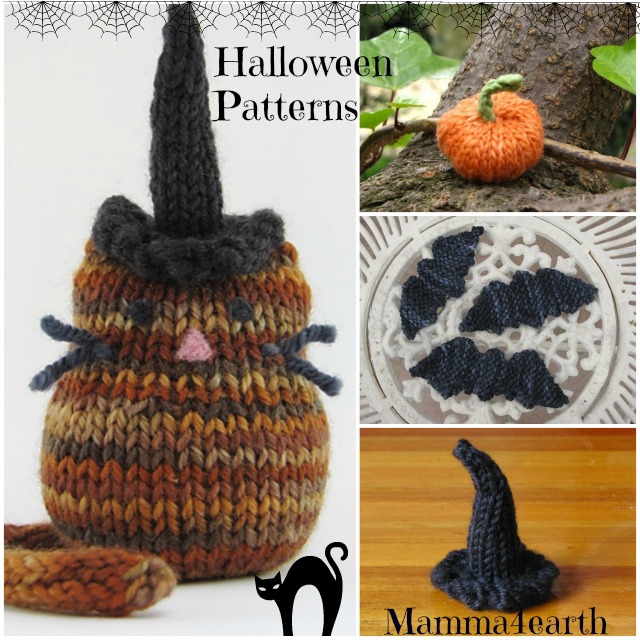
Halloween Knits, Free e-Book Download

Halloween Collage With Writing

Hello friends,

I have compiled all my Halloween themed patterns into a little pattern e-book for you, if you’d like to download it, you can find it here on Ravelry for Free 🙂 Oh yes and if you do knit a few projects we would love to see them, so please share your photos on my Ravelry group for all see:)

Happy knitting,

Joining Ginny’s Yarn Along today.

xo

Linda

8

Witches Hat Pattern for Halloween

Today I knitted up this little witches hat for the Halloween season which has so many possibilities… It can be used for a mobile, a little moblie of hats or just a hanging ornament somewhere, Halloween decor… Another nice idea is to use them as Halloween party invitations with the details attatched on a piece of card by string:) It’s not too big, about 2.5 inches tall and you could make it bigger by doubling the pattern. Such a quick and easy little knit, it took me about 15 minutes from beginning to end:)

Materials:

Scraps of black yarn.
4mm / 6 US circular needles or 4 DPNs
Wool needle for sewing in the ends
Fleece if you want to stuff your hat, makes it look nice and full.

Pattern:

Cast on 30 stitches and join for knitting in the round with the magic loop technique or your DPNs.
Round 1: Knit
Round 2:(Knit 1, Knit 2 together) across the round. (20 stitches)
Round 3: Purl
Round 4: Knit 2 together across the round. (10 stitches)
Rounds 5 to 11: Knit
Round 12: Knit 1, knit 2 together, knit 4, knit 2 together, knit 1. (8 stitches)
Rounds 13-15: Knit
Round 16: Knit 1, knit 2 together, knit 2, knit 2 together, knit 1. (6 stitches)
Rounds 17-18: Knit
Round 19: Knit 1 knit 2 tog, knit 2 tog, knit 1. (4 stitches)
Round 20: Knit
Round 21: Knit 2 together, knit 2 together.

Break yarn and thread it through a wool needle and thread the needle through the remaining stitches and pull tight. Sew in all the ends.

You are finished!
Happy knitting:)

Please note this pattern is copy written and may not be used for commercial purposes, thank you.

16

Halloween Witches Broomstick Tutorial

This is such a quick and easy tutorial to make a minature witches broomstick for Halloween. They are lovely for mobiles, table place setting name tags, broomsticks or as a gift at a Halloween party etc…

Materials:
Stick
Long dry grass
Twine to wind around your stick
Scissors

Take a bunch of the grass and place it around the end of your twig.
Wind your twine around the grass to secure it to the stick.

Once you have wound it around securely, trim the ends with your scissors to neaten your broom.

Take care and Happy Halloween:)
xo
Linda

9

Halloween Lino Prints

I saw a lovely blog post over at Farmama this morning, where they have made beautiful prints. My girls were keen to give this a try, so we went searching for materials around our home. We had some polystyrene in a  box that our dehydrator was delivered in and we thought we would recycle it to make our prints. It worked really well too:)

Materials we used:
Polystyrene
Carving tools
Ink or paint
Ink roller to roll your ink / paint
Card
Craft knife to cut your polystyrene
Pencil

First we drew our picture onto our polystyrene in pencil.

Then we took our carving tools and carved out our picture along the lines.

Roll your roller in your ink making sure it is covered completely.

Roll your ink all over your carving.

Press your polystyrene onto the card firmly. And there is your print!

These are some other prints Jenna and Erin did today.

Perfect for birthday cards etc…
Happy Monday!
xo
Linda

Related Posts Plugin for WordPress, Blogger...
17

Powered by WordPress. Designed by Woo Themes


Hit Counter provided by Los Angeles SEO Company