
You Tube link for how to knit with the Magic Loop.
Here is a You Tube video link on how to change colours while knitting in the round.
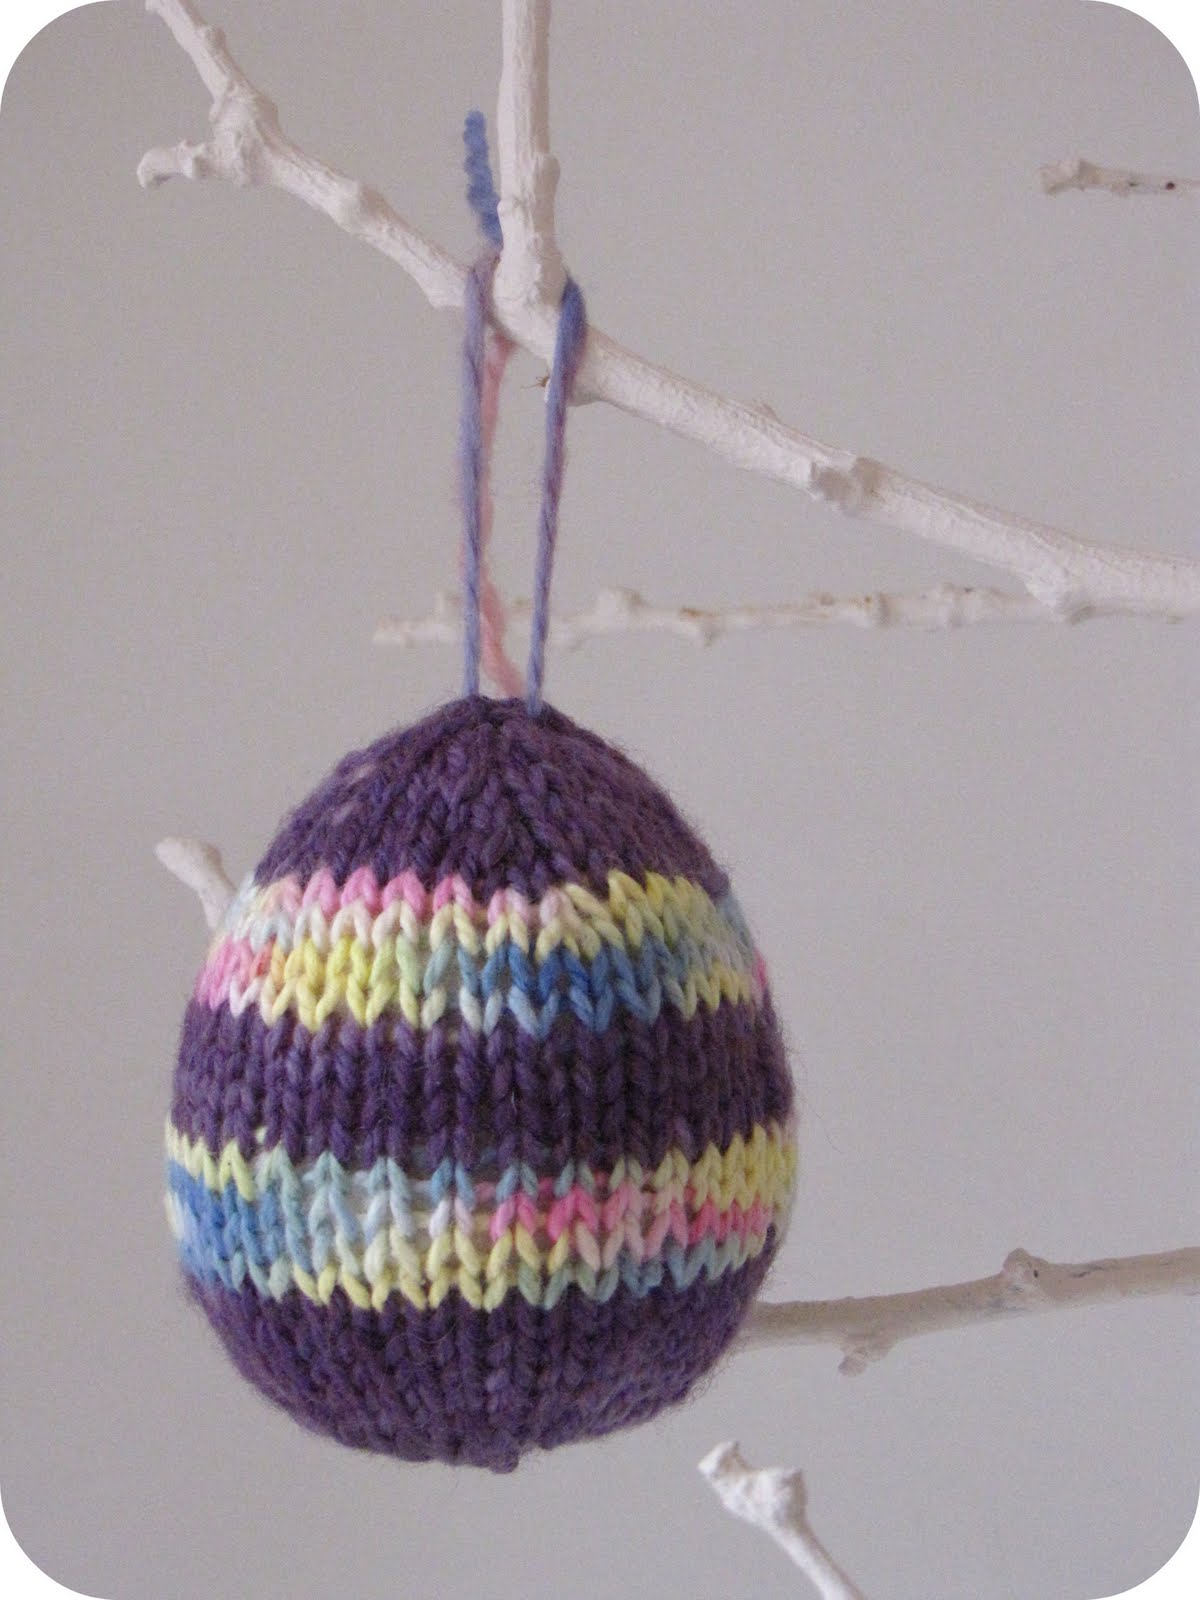
Cast on 9 stitches on circular needles and divide up as seen in the photo above to start knitting:)
Knit 1 round
Knit into the front and back of each stitch in next round increasing your stitches to 18.
Knit 1 round
Knit into front and back of each stitch in next round increasing your stitches to 36.
Knit 6 rounds
Change colour, knit 4 rounds,
Change colour, knit 4 rounds,
Change colour, knit 4 rounds,
Change colour
(Knit 5 stitches knit 2 together) continue this across the entire round and knit 1 stitch at the end of the round.
Knit 1 round.
(Knit 5 stitches, knit 2 together) continue this across the ertire round, knit 3 stitches on the end.
Knit 1 round.
(Knit 5 stitches, knit 2 together) continue this across the round, knit 1 stitch on the end.
Knit 1 round.
(Knit 2 together) continue all across the round.
(Knit 2 together) continue all across the round, knit 1 on end.
(If you just want to knit a solid egg, just knit through all the rows on the same colour:)
Finishing off:
Break your thread and thread your yarn onto a wool needle and thread your stitches from your circular neeldes onto your wool needle and pull tight to close the opening. I normally fill the egg from this end and make sure the the wide base is firm and then fill the rest of the egg. Close both ends by threading tight in a circle with your thread and pulling tightly closed.
Roll your egg in your hands to get the required egg shape, and there you have an Easter Egg!
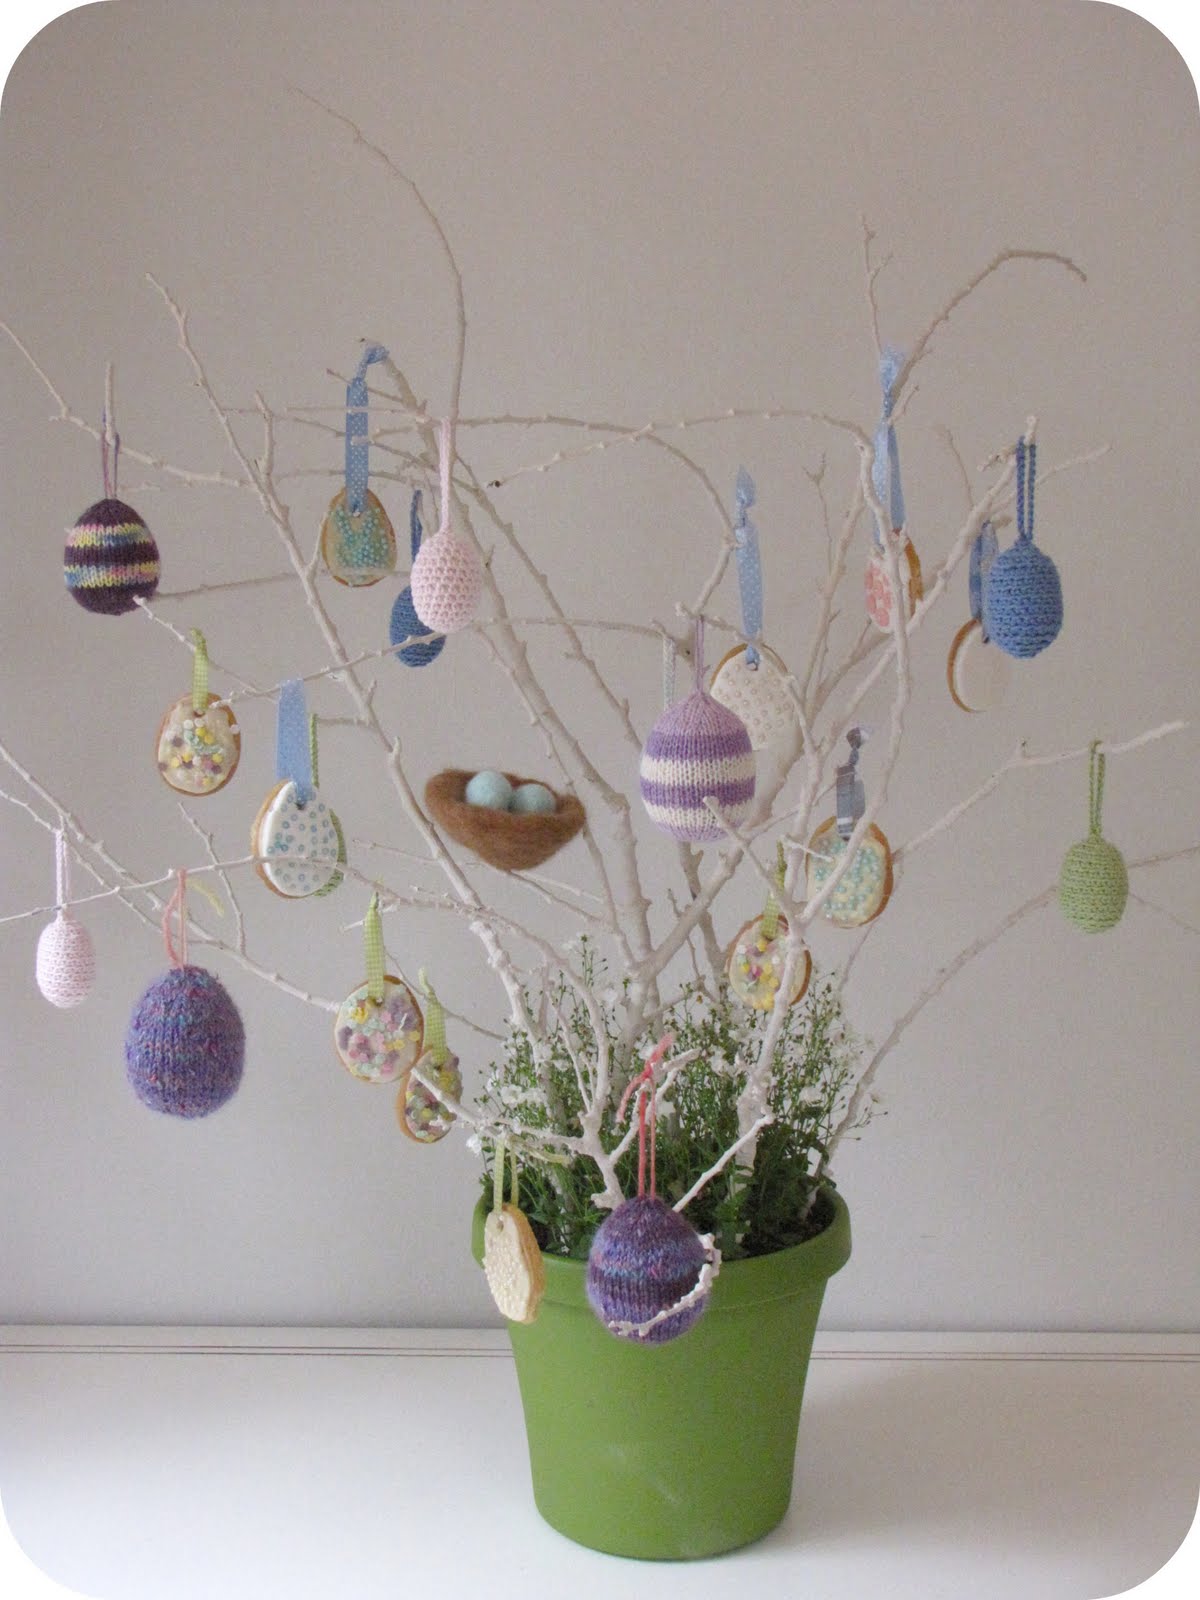
I just tied a little thread of rainbow yarn through the top of my egg so it could hang in the tree, you could also crochet a chain if you like.
Here is the actual link with photos of my knitted Easter Egg tutorial:)

We are in full swing with our Share the Love Heart Swap, thank you to everyone who has sent in their names and details, if you haven’t heard from us yet you will soon and we will partner you up with a swap partner:) If you would still like to join, please do and don’t forget to send in your name, address and blog link to myself lindadawkins@mweb.co.za or Heidi at gerry@mweb.co.za and we will partner you up for the swap.
To read more about the swap, view here.
Happy Thursday friends, from rainy South Africa,
Warmly
Linda
Oh, goody – I get to show off my red egg.
http://krandle.com/kstreetjournal/2010/03/29/wrong-side-of-the-mirror-pt-2/
Linda – the tree is just so delicious. For some reason, I had no vision of what would happen with it, but here it is, really very uplifting of heart in its color and sweetness. I even made my husband look at it – closely. You two girls have such joy in your natures. The tree is full of light and hope. To be fair to me, here, I suppose I should point out that you’ve been enjoying living weather rather than this gray, sleety mess I’ve been seeing day after day. But something tells me you two would rise above that, too – and sail on, loving your lives and seeing the wonder in them.
Is it legal to contact your swap buddy? All new to me.
Yay! I am off to cast on some eggs. Hopefully I can get four done in time…one a day should be doable.
:)Lisa
What a beautiful Easter tree and how special to be sharing this with your friend…
Warm wishes, Tonya
Dear K,
Thank you so much for your lovely message:) and thank you for sharing your beautiful link for your knitted Easter egg.
Please do contact your swap partner, this is what makes swaps so special, the new connections we make with people all over the world.
Warmly
Linda
Dear Lisa,
Enjoy the tutorial and do send a link through of your lovely knitted eggs when they are finished so we can all enjoy your creativity:)
Have a wonderful Easter,
Warmly
Linda
Dear Tonya,
It is lovely to hear from you, I received your parcel today including your natural beeswax and the sweet little easter rabbit you sent with is adorable! Thank you so much,
Warmly
Linda
I love it! Your knitted eggs are adorable, Linda… Thank you 🙂
Love,
Heidi 🙂
Dear Heidi,
Thank you my friend!
Hugs
Linda
I love the knitted Easter eggs. I think I’ll have an Easter tree next year, such a fun idea!
I am loving all of your tutorials. I am afraid to share pics of the eggsI made b/c I have forgotten how eggs are shaped (I haven’t eaten eggs since I was 15) so I goofed up the stuffing *sigh* oh well. Here’s my funny shaped eggs:
http://frontierdreams.blogspot.com/2010/03/root-children-arrived.html
Dear Nicole,
Your knitted eggs are beautiful, thank you so much for sharing your link with us:)
Warmly
Linda
The Easter tree is gorgeous!! By the way, is it winter in SA? It is spring in the USA, lol ^^
Stefanie
The tree is looking beautiful, Linda. I love your knit eggs! Thank you so much for the tutorial.
Dear Stefanie,
Thanks so much for following my blog and for leaving a comment:) We have just begun with Autumn here, happy Spring to you!
Warmly
Linda
Oh Linda and Heidi your tree looks beautiful – I love it! Wishing you and your families a wonderful easter together.
The tree really is starting to look gr8. =]
Happy Easter Friday =]
Oh, I love the egg tree. So festive and beautiful!
Next year I must have easter grass under my tree!!! That is so pretty!
I know you’ve seen my already, but still I will share here…
http://heirloomseasons.blogspot.com/2010/03/wip-almost-wednesday.html
Renee 🙂
What did you stuff the eggs with? What are the options?